Importing OVF Templates of VMs that use UEFI Boot Mode
It has come to my attention that OVF templates created from VMs that utilize UEFI boot mode generally won't boot without manual intervention after import to a new hypervisor. Example screenshots of failed boot due to missing UEFI boot records:

This behavior, cause, and a work around (migrate the nvram file) can be found in the following VMware KB article: https://kb.vmware.com/s/article/2061784
I found migrating the nvram file a bit hacky personally - it's just about as much overhead to perform this migration as reinstalling the bootloader, and differences in VM configuration may render the nvram migration operation unsuccessful anyway. Because of this, I will not be providing nvram files for OVF templates I share.
This article aims to collect the required steps to remediate this issue for UEFI OVF templates hosted at https://vms.amanshortly.com.
Arch Linux
These steps apply to any images matching the naming pattern *arch-linux*.
VMware Hypervisors
These steps were last verified on 2020-09-12 in VMware Workstation version 15.5.6 build-16341506
- Import the OVF template
- Update VM settings as follows:
- Options > General: Set
Guest operating systemtoLinux > Other Linux 5.x or later kernel 64-bit - Options > Advanced: Set
Firmware typetoUEFI
- Options > General: Set
- Run the VM
- Press
Escat the EFI boot screen to enter Boot Manager - Select
Enter setup, then pressEnter - Select
Boot from a file, then pressEnter - Proceed to the All Hypervisors section below
Oracle VirtualBox
These steps were last verified on 2020-09-12 in Oracle VirtualBox version 6.1.14r140239
Note that the Arch Linux VM was created in a VMware hypervisor, and as a result does not include VirtualBox specific drivers - this is why the storage controller type change is necessary. If you intend to use VirtualBox to run this image, I strongly recommend removing the open-vm-tools package, and installing VirtualBox Guest Additions as soon as you get the operating system to boot successfully.
- Import the OVF template
- Update VM settings as follows:
- General > Basic: Set
TypetoLinux - General > Basic: Set
VersiontoArch Linux (64-bit) - System > Motherboard: Check
Enable I/O APIC - System > Motherboard: Check
Enable EFI (special OSes only) - Storage > Controller: SCSI: Set
TypetoAHCI - Storage > Controller: SCSI: Set
NametoSATA
- General > Basic: Set
- Run the VM
- At the
UEFI Interactive Shellrun the commandexit - Select
Boot Maintenance Manager, then pressEnter - Select
Boot From File, then pressEnter - Proceed to the All Hypervisors section below
All Hypervisors
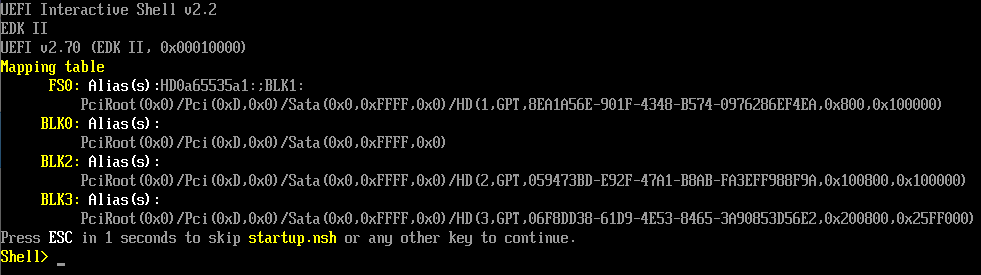
Starting point for these steps is the "boot from file" UEFI firmware menu:
- Select the device with UUID
8EA1A56E-901F-4348-B574-0976286EF4EA, then pressEnter - Select directory
<EFI>, then pressEnter - Select directory
<arch>, then pressEnter - Select file
grubx64.efi, then pressEnter(grub bootloader should have launched, and system should have booted - if not, double check hypervisor specific configuration steps) - Log in to the VM with
root/TempP@ss - Run the command
grub-install --target=x86_64-efi --efi-directory=/efi, or use the shortcut command!21to run the same command from history - Shut down, power back on, and verify that UEFI boot is successful